Having trouble adding the nomination badge to your blog side bar or posts?
There are a few tricks to it, especially in side bars because you need to use HTML code.
So I thought some of you might like some extra help with instructions.
Adding Your Badge To Your Blog Sidebar
I’ve written the HTML code for all badges with links back to the poll page — so for those that don’t know how to write the code or like the easy option!
Adding your badge now is as easy as:
- Download this Badges zip file (oops missed a badge – and SocialNetworking Zip for Social networking badge – thanks Martin Hawksey for letting me know)
- Unzip the downloaded file to a folder on your hard drive.
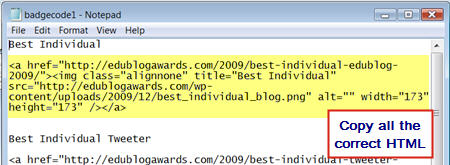
- Open up badgecode1.txt (contained inside the zip file)
- Copy the HTML code for your nomination badge
- Go to Appearance > Widgets in your Dashboard
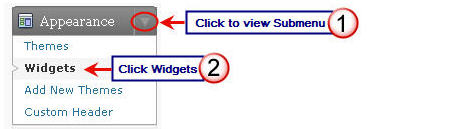
- Drag and drop a Text Widget from the Available Widgets or Inactive Widgets areas on the left into the Sidebar area on the right
- Now just paste your HTML code into the text widget, then click Save and Close

Pesto!
Your nomination badge should now display in your blog sidebar and clicking on it will take readers to the page where they can add their vote!
Adding Your Badge To A Blog Post
You have two options.
- Use the HTML code I’ve created (Badges zip file) and click on the HTML Tab in your Write post area then paste the code
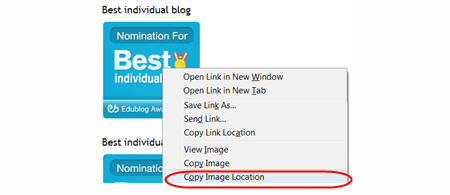
- Copy the Image URL from Nomination Badges Are Now Available! post by:
- Right clicking on the image and selecting Copy Image location or Copy Shortcut.
- Then insert the image in your post by clicking on Add an Image and adding the image URL.
8 responses to “Having Trouble Adding Your Nomination Badge? Here's Some Help!”
Hi, the badges zip appears to be missing best social network badge
Martin
Thanks Martin for letting me know. I’ve now uploaded it as a separate zip file and thanks you for letting me know.
Thanks Sue. I have so many problems with widget code embedding into my sidebar. This went in easy. Of course, the code was written by a true professional!
@Jenny Glad it helped. Now I’m sure you want to hear the Sue Water’s sneaky tricky for writing the HMTL code?
The easiest method is just open up a new post (Post > Add New). Grab the image URL and insert the image into the post using the Add An Image Icon. For the box that says Link image to you just add the URL of the page you want to link to.
Once you’ve added all those details just click Insert into Post – to add the image to your post. Presto! Your visual Editor has just written the HTML code for you.
Now just click on HTML tab and copy all of the HMTL code then paste into a text widget.
PS don’t tell any one Sue cheats 🙂
Hi
Is this a lot easier to do in blogger? All I had to do was ‘add a gadget’, then ‘add a picture’ where I copied in image URL (http://edublogawards.com/wp-content/uploads/2009/12/most_influential_blog_post.png) and then added caption “Vote here”, and added the link to the voting page, in case anyone actually wanted to vote for me!
See result on my blog
http://www.wishfulthinkinginmedicaleducation.blogspot.com
Thanks
AM
Ssshhh….Your secret is safe with me Sue. : )
@Anne Marie Definitely because with Blogger you have different options that you can use that makes it easier.
Whereas with a WordPress powered blog you need to use HTML code in the text widget.
Each blogging platform has it pros/cons; for me biggest negative of Blogger is lack of pages.
@Jenny chuckling 🙂
[…] Here’s instructions on how to add your badge to your blog sidebar or a post! […]